
go-zero学习 — 基础
go-zero学习 — 基础
- 1 参考
- 2 goctl 相关命令整理
- 2.1 .api生成swagger的命令
- 2.2 .api生成api模块的命令
- 2.3 .proto生成rpc模块的命令
- 2.4 sql文件生成model的命令
- 2.5 docker启动swagger的命令
- 3 架构图
- 4 go-zero环境搭建
- 4.1 注意事项
- 4.2 go-zero 需要安装的组件
- 4.3 方式 1
- 4.4 方式 2
- 4.4.1 Protobuf下载安装
- 4.4.2 goctl 安装
- 5 简单入门
- ※6 配置介绍
- 6.1 api配置
- 6.2 rpc配置
- 7 单体服务
- 8 微服务
- 8.1 代码
- 8.2 注意事项
- 8.3 服务划分及创建
- 8.4 完善用户服务【user】
- 8.4.1 .proto生成user服务各部分代码
- 8.4.2 完善代码逻辑
- 8.5 完善订单服务【order】
- 8.5.1 .api生成order服务各部分代码
- 8.5.2 order服务添加调用user服务的配置
- 8.6 完善order服务调用user服务的逻辑
- 8.7 启动服务
- 8.8 访问
1 参考
- 官方文档:https://go-zero.dev/cn
2 goctl 相关命令整理
2.1 .api生成swagger的命令
示例:
goctl api plugin -plugin goctl-swagger="swagger -filename xxx.json" -api xxx.api -dir .
2.2 .api生成api模块的命令
示例:
goctl api go -api ./doc/admin.api -dir .
2.3 .proto生成rpc模块的命令
示例:
goctl rpc protoc xxx.proto --go_out=./ --go-grpc_out=./ --zrpc_out=.
生成的文件名有下划线分割:
goctl rpc protoc xxx.proto --go_out=./ --go-grpc_out=./ --zrpc_out=. --style=go_zero
logic分组:【不推荐,改动太大】
首先是将proto里的service 进行分组:
service User {rpc getUser(IdRequest) returns(UserResponse);
}
service File {rpc FileUpload(FileList) returns(FileList);
}
然后执行:
goctl rpc protoc xxx.proto --go_out=./ --go-grpc_out=./ --zrpc_out=. --multiple
2.4 sql文件生成model的命令
goctl model mysql ddl -src="./rpc/doc/sql/appsystem/dsms*.sql" -dir="./rpc/model/appsystemodel"
2.5 docker启动swagger的命令
docker run -d -p 9981:8080 --name=swagger-tracksourcetask -v /root/doc:/tmp -e SWAGGER_FILE=/tmp/tracksourcetask-v2.json swaggerapi/swagger-editor
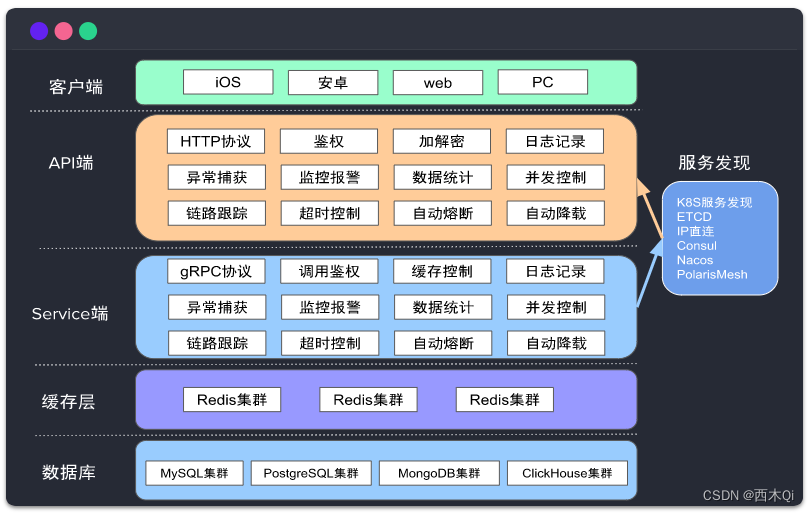
3 架构图
4 go-zero环境搭建
go-zero的是基于go的,所以首先需要安装配置go环境,go的安装配置可参考:Golang安装配置、GoLand安装配置 ,此处不再赘述。
4.1 注意事项
注意:如果是更新组件的版本,建议先备份原来的组件,防止最新版本的组件出现不兼容的问题。
4.2 go-zero 需要安装的组件
- protoc
- protoc-gen-go
- protoc-gen-go-grpc
- goctl
4.3 方式 1 和 4.4 方式 2 均能安装go-zero的环境,如果按照方式1安装某个组件失败,可按方式2来安装缺失的组件。
4.3 方式 1
- 先下载
goctl
go install github.com/zeromicro/go-zero/tools/goctl@latest
查看goctl版本:goctl -v
PS E:\SoftwareData\Aliyun> goctl -v
goctl version 1.4.3 windows/amd64
- goctl一键安装
protoc、protoc-gen-go、protoc-gen-go-grpc
goctl env check -i -f --verbose
4.4 方式 2
4.4.1 Protobuf下载安装
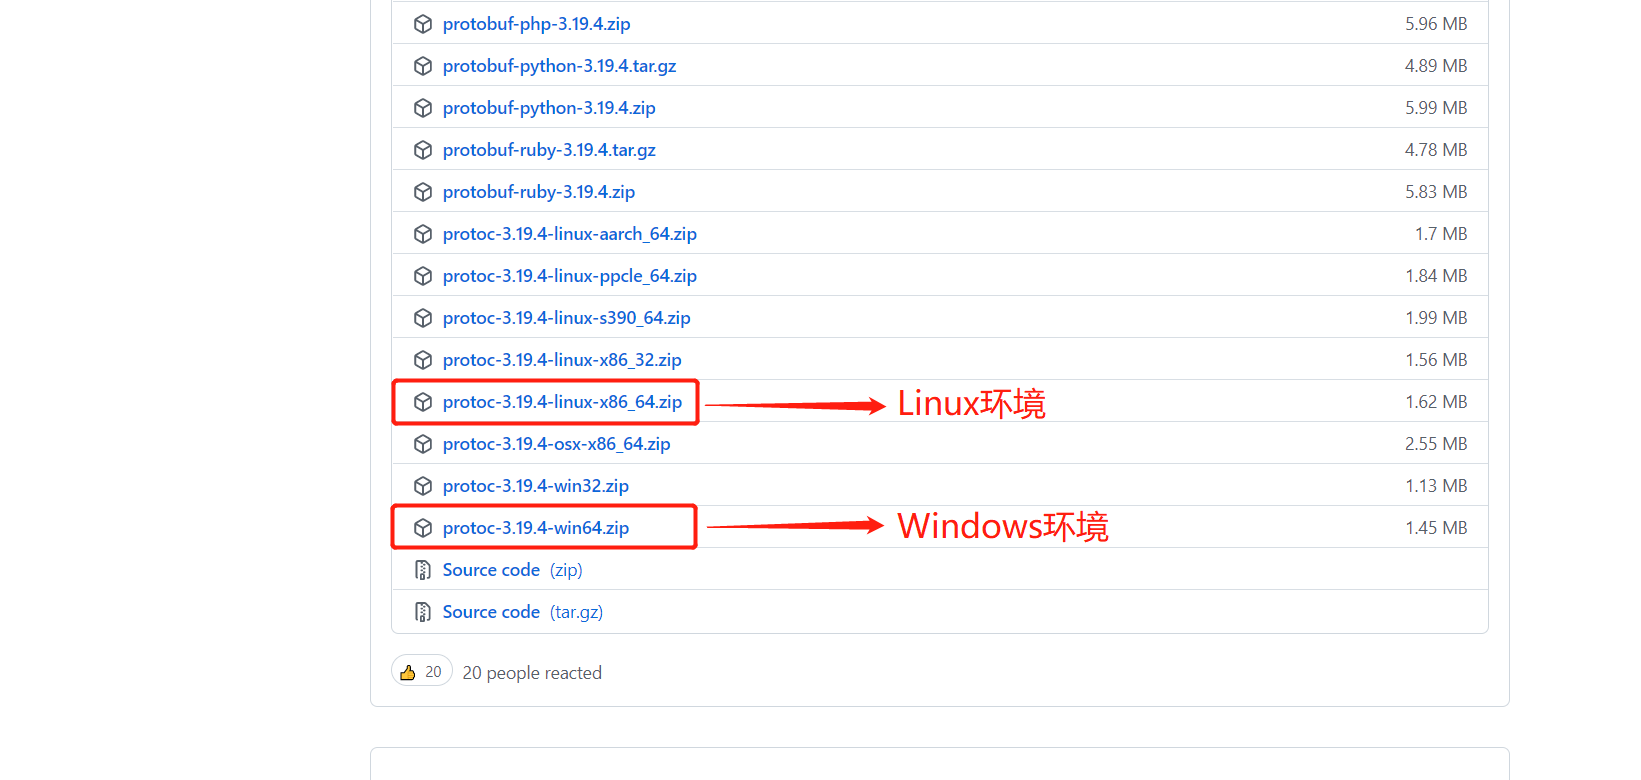
需要先下载protoc执行器
- 到 https://github.com/protocolbuffers/protobuf/releases 分别下载Windows和Linux环境的执行器
- 选择最新版本的protoc下载
- 将下载的文件解压,将解压后的bin目录加入到环境变量的path下。
- 查看安装是否成功:
protoc --version
Protobuf下Go、GRPC插件的安装
protoc-gen-go:Go专用的protoc的编译器插件,安装后会在GOPATH的bin目录下生成一个protoc-gen-go.exe
protoc-gen-go-grp:Go调用grpc的插件,安装后会在GOPATH的bin目录下生成一个protoc-gen-go-grpc.exe
go install google.golang.org/protobuf/cmd/protoc-gen-go@v1.26
go install google.golang.org/grpc/cmd/protoc-gen-go-grpc@v1.1
至此使用Protobuf的准备工作就做完了。
4.4.2 goctl 安装
go install github.com/zeromicro/go-zero/tools/goctl@latest
5 简单入门
快速生成api服务,api服务就是网关服务,如果不与Service端【RPC端】交互,则可以独立成一个单独的服务。
goctl api new greet
cd greet
go mod init
go mod tidy
go run greet.go -f etc/greet-api.yaml
默认侦听在 8888 端口(可以在配置文件里修改):
curl -i http://localhost:8888/from/you
返回如下:
HTTP/1.1 200 OK
Content-Type: application/json; charset=utf-8
Traceparent: 00-45fa9e7a7c505bad3a53a024e425ace9-eb5787234cf3e308-00
Date: Thu, 22 Oct 2020 14:03:18 GMT
Content-Length: 14null
※6 配置介绍
6.1 api配置
参考:api配置
6.2 rpc配置
参考:rpc配置
7 单体服务
参考:单体服务
8 微服务
8.1 代码
代码:https://gitee.com/XiMuQi/go-zero-micro/tree/v1.0.0【暂不对外开发】
8.2 注意事项
go-zero微服务的注册中心默认使用的是Etcd。
本小节将以一个订单服务调用用户服务来简单演示一下,其实订单服务是api下的一个网关,用户服务是rpc下的一个后端服务。
这里的创建步骤和官方文档的不一致,做了部分优化,前提是已经了解了go-zero微服务调用及配置流程。初学者还是推荐按照官方文档操作。
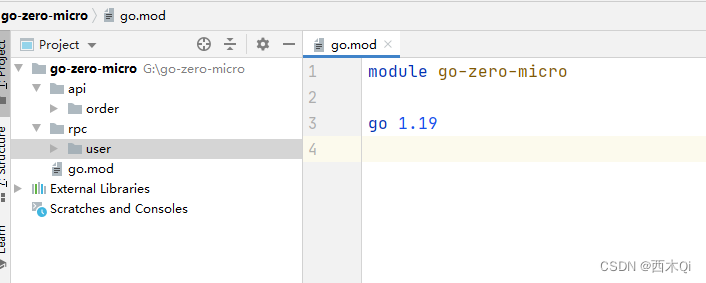
8.3 服务划分及创建
- 创建
go-zero-micro文件夹 - 在
go-zero-micro文件夹分别创建api、rpc文件夹 - 在
api下创建order文件夹 - 在
rpc下创建user文件夹
整个服务结构
8.4 完善用户服务【user】
8.4.1 .proto生成user服务各部分代码
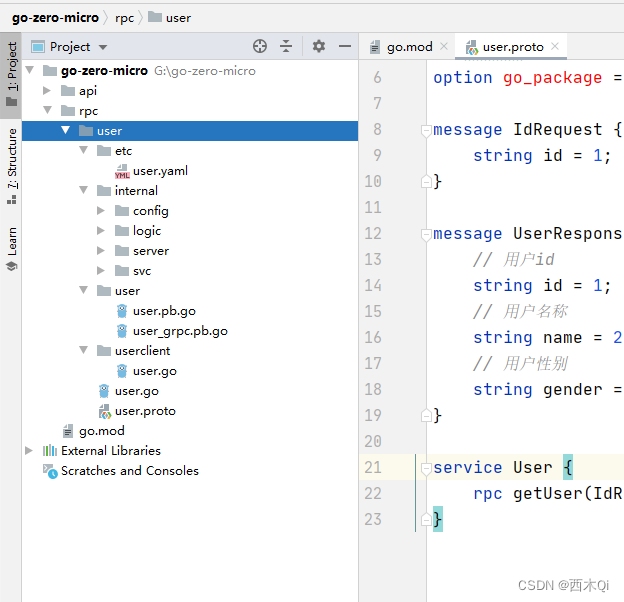
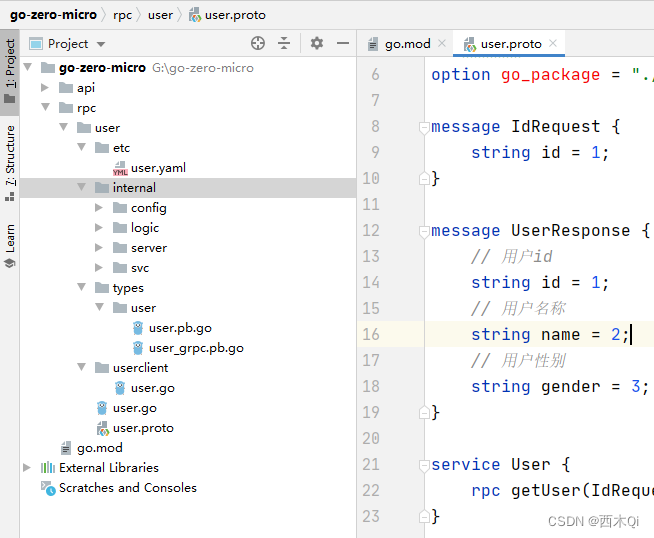
- 在
user服务下添加user.proto文件,增加getUser方法
syntax = "proto3";package user;// protoc-gen-go 版本大于1.4.0, proto文件需要加上go_package,否则无法生成
option go_package = "./user";message IdRequest {string id = 1;
}message UserResponse {// 用户idstring id = 1;// 用户名称string name = 2;// 用户性别string gender = 3;
}service User {rpc getUser(IdRequest) returns(UserResponse);
}
- 执行生成命令
在go-zero-micro\rpc\user>下执行
goctl rpc protoc user.proto --go_out=./ --go-grpc_out=./ --zrpc_out=.
生成user服务代码结构:
附:官方文档给出的命令:
goctl rpc protoc user.proto --go_out=./types --go-grpc_out=./types --zrpc_out=.
生成的代码结构:
两个命令的主要区别是官方文档给出的命令指定了 .pb.go和 _grpc.pb.go 所在位置,这个不影响代码逻辑。
8.4.2 完善代码逻辑
user服务的代码逻辑主要是在 internal/logic/xxx logic.go里填写,xxx logic.go的xxx指的是在.proto中定义的方法名的小写。
例如:
user.proto
rpc getUser(IdRequest) returns(UserResponse);
对应 internal/logic/getuserlogic.go,一个rpc方法对应一个logic.go。在logic.go中可以进一步处理请求,比如操作数据库,Redis等。
package logicimport ("context""go-zero-micro/rpc/user/internal/svc""go-zero-micro/rpc/user/user""github.com/zeromicro/go-zero/core/logx"
)type GetUserLogic struct {ctx    context.ContextsvcCtx *svc.ServiceContextlogx.Logger
}func NewGetUserLogic(ctx context.Context, svcCtx *svc.ServiceContext) *GetUserLogic {return &GetUserLogic{ctx:    ctx,svcCtx: svcCtx,Logger: logx.WithContext(ctx),}
}func (l *GetUserLogic) GetUser(in *user.IdRequest) (*user.UserResponse, error) {// todo: add your logic here and delete this lineuserRes :=&user.UserResponse{Id: in.Id,Gender: "男",}if in.Id == "1" {userRes.Name = "admin"}else {userRes.Name = "test"}return userRes, nil
}
8.5 完善订单服务【order】
8.5.1 .api生成order服务各部分代码
- 在
order服务下添加order.api文件,增加getUser方法
syntax = "v1"info(title: "type title here"desc: "type desc here"author: "type author here"email: "type email here"version: "type version here"
)type(OrderReq {Id string `path:"id"`}OrderReply {Id string `json:"id"`Name string `json:"name"`}
)
service order {@handler getOrderget /api/order/get/:id (OrderReq) returns (OrderReply)
}
- 执行生成
order服务的命令
在go-zero-micro\api\order>下执行
goctl api go -api order.api -dir .
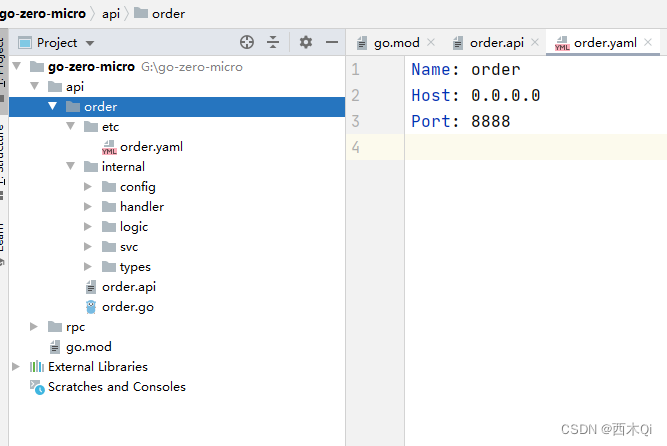
生成order服务代码结构:
8.5.2 order服务添加调用user服务的配置
order服务调用user服务需要改动3个地方。
1 etc/order.yaml
2 internal/config/config.go
3 internal/svc/servicecontext.go
- etc/order.yaml
主要是配置user服务的Etcd服务发现。注意要和user服务的user.yaml的Etcd地址一致。
# order.yaml
Name: order
Host: 0.0.0.0
Port: 8888
UserRpc:Etcd:Hosts:- 192.168.13.3:2379Key: user.rpc
user.yaml:
# user.yaml
Name: user.rpc
ListenOn: 0.0.0.0:8080
Etcd:Hosts:- 192.168.13.3:2379Key: user.rpc- internal/config/config.go
主要是加入user服务的RPC。
package configimport ("github.com/zeromicro/go-zero/rest""github.com/zeromicro/go-zero/zrpc"
)type Config struct {rest.RestConfUserRpc zrpc.RpcClientConf
}
- internal/svc/servicecontext.go
主要是将 2 配置的user服务接口加入到order服务的ServiceContext中。
package svcimport ("github.com/zeromicro/go-zero/zrpc""go-zero-micro/api/order/internal/config""go-zero-micro/rpc/user/userclient"
)type ServiceContext struct {Config config.ConfigUserRpc userclient.User
}func NewServiceContext(c config.Config) *ServiceContext {return &ServiceContext{Config:  c,UserRpc: userclient.NewUser(zrpc.MustNewClient(c.UserRpc)),}
}
8.6 完善order服务调用user服务的逻辑
order服务修改 getorderlogic.go :
package logicimport ("context""errors""go-zero-micro/api/order/internal/svc""go-zero-micro/api/order/internal/types""go-zero-micro/rpc/user/user""strconv""github.com/zeromicro/go-zero/core/logx"
)type GetOrderLogic struct {logx.Loggerctx    context.ContextsvcCtx *svc.ServiceContext
}func NewGetOrderLogic(ctx context.Context, svcCtx *svc.ServiceContext) *GetOrderLogic {return &GetOrderLogic{Logger: logx.WithContext(ctx),ctx:    ctx,svcCtx: svcCtx,}
}func (l *GetOrderLogic) GetOrder(req *types.OrderReq) (resp *types.OrderReply, err error) {// todo: add your logic here and delete this lineId,err := strconv.Atoi(req.Id)if err != nil {return nil, err}if Id < 1{return nil, errors.New("用户不存在")}userRes, err := l.svcCtx.UserRpc.GetUser(l.ctx, &user.IdRequest{Id: req.Id,})if err != nil {return nil, err}return &types.OrderReply{Id:   req.Id,Name: userRes.Name,}, nil
}
8.7 启动服务
- 首先要确保Etcd已运行。
- 注意启动顺序,需要先启动
user服务再启动order服务。
user服务启动是执行user服务下的user.go
如果启动报找不到user.yaml,则是因为user服务在go-zero-micro下,更改下user.yaml的引入路径即可。
error: config file etc/user.yaml, open etc/user.yaml: The system cannot find the path specified.
user.go:
package mainimport ("flag""fmt""go-zero-micro/rpc/user/internal/config""go-zero-micro/rpc/user/internal/server""go-zero-micro/rpc/user/internal/svc""go-zero-micro/rpc/user/user""github.com/zeromicro/go-zero/core/conf""github.com/zeromicro/go-zero/core/service""github.com/zeromicro/go-zero/zrpc""google.golang.org/grpc""google.golang.org/grpc/reflection"
)var configFile = flag.String("f", "rpc/user/etc/user.yaml", "the config file")func main() {flag.Parse()var c config.Configconf.MustLoad(*configFile, &c)ctx := svc.NewServiceContext(c)s := zrpc.MustNewServer(c.RpcServerConf, func(grpcServer *grpc.Server) {user.RegisterUserServer(grpcServer, server.NewUserServer(ctx))if c.Mode == service.DevMode || c.Mode == service.TestMode {reflection.Register(grpcServer)}})defer s.Stop()fmt.Printf("Starting rpc server at %s...\n", c.ListenOn)s.Start()
}
order服务启动是执行order服务下的order.go
如果启动报找不到order.yaml,则是因为order服务在go-zero-micro下,更改下order.yaml的引入路径即可。
package mainimport ("flag""fmt""go-zero-micro/api/order/internal/config""go-zero-micro/api/order/internal/handler""go-zero-micro/api/order/internal/svc""github.com/zeromicro/go-zero/core/conf""github.com/zeromicro/go-zero/rest"
)var configFile = flag.String("f", "api/order/etc/order.yaml", "the config file")func main() {flag.Parse()var c config.Configconf.MustLoad(*configFile, &c)server := rest.MustNewServer(c.RestConf)defer server.Stop()ctx := svc.NewServiceContext(c)handler.RegisterHandlers(server, ctx)fmt.Printf("Starting server at %s:%d...\n", c.Host, c.Port)server.Start()
}
8.8 访问
order服务的端口配置在order.yaml中,具体的调用地址可在:order/internal/handler/routes.go中查看。
本示例的完整调用地址为:http://localhost:8888/api/order/get/{参数}
测试1:
请求地址:http://localhost:8888/api/order/get/1
返回结果:{"id":"1","name":"admin"}
测试2:
请求地址:http://localhost:8888/api/order/get/2
返回结果:{"id":"2","name":"test"}
测试3:
请求地址:http://localhost:8888/api/order/get/-1
返回结果:用户不存在